
Could it be YOU?
Join us here at AllyScraps on Wednesday, October 1st for a MONTH-LONG scrappy event, full of inspiration. Nope, not America's Next Top Model... but AllyScraps Next Top Scrapbooker!
Look for 4 weekly challenges times 2 (yep, that's 8 challenges... 4 biggies, 4 smaller)!
Prizes, yep, all month long PLUS one awarded to AllyScraps Newest Top Scrapbooker!
AND, some lucky participant may be chosen as AllyScraps newest Design Team member!
Hurray. This is going to be loads of fun, hope you'll join us.
Check out all the excitement in the AllyScraps FORUM!
Sunday, September 28, 2008
Thursday, September 25, 2008
My Mind's Eye and Hero Arts Just in!

We always stock the latest products and we've just added, the new (and rather gorgeous) Dreamy 2 Collection from My Minds Eye,

And something for the boys in your life.

Two more lines from Dream Street, and new Fall and Christmas stamps from Hero Arts.

Don't forget the fall season is just around the corner, K & Company has an awesome line, Fall Harvest, and My Minds Eye has out done themselves with two new Halloween lines as well as two Christmas lines.

Also recently added and going quickly, October Afternoon Hometown clollection, and the very latest Cosmo Cricket!
Shipping is still only $4.95 on all order shipped within the U.S.
Have a great day
Cathy

P.S.
Have you heard about AllyScraps Next Top Scrapbooker Contest? This event starts October 1st more information here or check back tomorrow for the very latest news.
(All images remain the copyright of their respective owners.)
Wednesday, September 24, 2008
More from your Stamps
I have to admit I'm a little biased because I love stamps. They are so versatile and can be just used again and again.
I was asked recently about some watercoloured images I had made and thought it might be fun to do a small 'how to'. Now, I'm no expert but this works for me!
I have just recently discovered watercolouring images and it's like being a kid again! I've used watercolour pencils because they are so simple to use and really doesn't require any expertise.

Stamp you image in a solvent based ink such as Staz-on. Watercolour paper is best but any heavy cardstock paper will do.
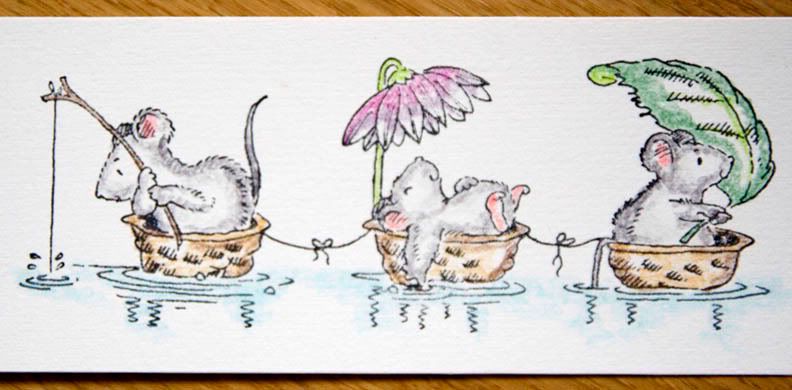
I start by going around the edges of my image with my pencil. Use the main colour first, add shadow colours or highlights next. Try to imagine where the highlights and low lights of the image would be for a more realistic effect.
Tip: I use small circular movements to prevent pencil marks later but you'll need to experiment with your pencils.

Now for the fun bit. Dip your paintbrush in the water and draw off any excess - you brush should be very damp rather than soaking wet. You can always add more.

Draw your brush from the edges towards the centre to 'pull' the colour. You may need to make more than one pass to get the effect that you want.

Allow the paper to dry before adding more detail such as rosy cheeks or pink tummys.

To make the card, I used some patterned paper from Depot Park from October Afternoon. Add a decorative edge and secure a ribbon along the bottom.

Voila! A beautiful card in about half an hour!
There are literally hundreds of beautiful stamps and the latest from Hero arts can be found here.
Happy stamping!
Morag x
I was asked recently about some watercoloured images I had made and thought it might be fun to do a small 'how to'. Now, I'm no expert but this works for me!
I have just recently discovered watercolouring images and it's like being a kid again! I've used watercolour pencils because they are so simple to use and really doesn't require any expertise.
Stamp you image in a solvent based ink such as Staz-on. Watercolour paper is best but any heavy cardstock paper will do.
I start by going around the edges of my image with my pencil. Use the main colour first, add shadow colours or highlights next. Try to imagine where the highlights and low lights of the image would be for a more realistic effect.
Tip: I use small circular movements to prevent pencil marks later but you'll need to experiment with your pencils.
Now for the fun bit. Dip your paintbrush in the water and draw off any excess - you brush should be very damp rather than soaking wet. You can always add more.
Draw your brush from the edges towards the centre to 'pull' the colour. You may need to make more than one pass to get the effect that you want.
Allow the paper to dry before adding more detail such as rosy cheeks or pink tummys.
To make the card, I used some patterned paper from Depot Park from October Afternoon. Add a decorative edge and secure a ribbon along the bottom.
Voila! A beautiful card in about half an hour!
There are literally hundreds of beautiful stamps and the latest from Hero arts can be found here.
Happy stamping!
Morag x
Saturday, September 20, 2008
Looking for just that perfect embellishment?
Who doesn't love finding that just perfect ready-to-stick-on-the-page embellishment? I know I do! But sometimes, what you have in your stash just isn't quite what you're looking for. So why not turn to those neglected stamps (come on, I know you have them!) and create something one-of-a-kind that suits your needs perfectly!
For my page "a quiet moment shared", I used several different stamp sets to add interest to my page, and give it just the extra personal touch that I was looking for and couldn't quite find in my usual stash of embellishments.

The page features the gorgeous papers and die-cuts of the October Afternoon "Hometown" line. I really liked the little index tab die-cut, and thought it would be perfect with a stamp from the Autumn Leaves Stamped and Coded collection. To give the stamping a crisper and neater look, I used Post-it notes to mask off the printed edges of the die-cut, so that only the white was left visible.

The scalloped circle at the lower corner of the photo includes several stamps and multiple layers. First I punched the large scalloped circle from the blue ledger paper, and stamped it with one of the circle borders from the Kelly Panacci 360 Degrees stamp set. Next, I cut a circle from a scrap of my background cardstock, and stamped it with the "live laugh love" stamp from the same KP set. After adhering these to my page underneath the photo, I added a chipboard heart, covered with the blue ledger paper, and stamped with the "smile" stamp and another circle border from the KP set. Just a bit of the border shows since most of it was off the heart, but that's ok - it's enough to give the sense of another circle border, and the common theme helps to tie the entire stamped embellishment cluster together.

Finally, I wanted to add another layered scalloped circle, with the date, along the page edge. Although the date itself was computer-printed on the paper to match the journaling, I dressed it up with a stamped circle - yet again, another one from the KP 360 Degrees set! This helps to tie together the circle theme throughout the page. Combining your stamps with text or graphics generated from your computer can be a very effective way to create custom embellishments!

And since I was in such a stamp-happy mood, I also added a border with these Kelly Panacci border stamps. They are so pretty, I really love the touch that they added to the page, and how the balance the October Afternoon die-cut border strip at the bottom.
So, are you itching to get out your stamps yet? I hope so! I would love to see what you can come up with when you start stamping away!
- Debbie
Friday, September 12, 2008
Adding Texture and Dimension to your Layouts
Hi Everyone!
I like to browse online galleries for inspiration when I am feeling uninspired. It is a sure place to find new techniques, interesting color combinations and fresh designs!
The other day while wandering I got to thinking about what made certain layouts "pop" out to me, while others were good but did not deliver as much "WOW" factor. I decided it was the addition of texture and dimension. My eye always spots and loves layouts with interesting textures and lots of lumpy stuff! My "book of inspiration" overfloweth with these kinds of layouts.
This realization inspired my to create this layout:
I used the new Pink Paislee Vintage Moom (http://www.allyscraps.com/SearchResults.asp?Search=Pink+Paislee+vintage+moon) on this layout about my second daughter's bedtime song. (I have sung it to her every night since she was about 6 months old and to this day, at age 6 she still requests it! - so sweet!)
To add dimension to this layout I cut out the owl and branch from the pattern paper and mounted it on chipboard and then cut around it. This method provides more strength than just cutting it out and using pop dots underneath; which you could add to the chipboard for even more dimension!
Then I used the new PP Topsiders border (the black on) to ground the layout on the bottom. The topsiders are the PERFECT way to add dimension (and they are already cut and ready to go, all you have to do is adhere the sticker to the chipboard and viola!)
To add dimension and texture to the big stars I hand sewed some gold bugle beads around the border (see, those bead sitting in your stash do have a use!). I used stickles around the smaller ones to add some dimension to them as well.
Now, that still wasn't enough for my dimensional eye, so I went further and added texutre to my title block and TopSider border by running an embroidery stitch along the edge of each.
These are all simple and inexpensive ways to add dimension and texture to your layouts which is sure to make people oh and ah over them!
I cannot wait to see "your" layouts with texture and dimension!
(If you have one to share please post a link to it here in the comments section.. you never know, I might have something special for a poster!)
Oh.. and btw.. BINGO is going to start this weekend on the AllyScraps Message Board! Head over and purchase your ticket and get ready to play! You could win an awesome gift certificate!
Bye for now!
Trish
Thursday, September 11, 2008
20% Discount on October Afternoon or Mr Campy?
Just delivered are new products Graphics 45, Edges from Bazzill, and Cosmo Cricket! Also recently added and going quickly, October Afternoon, Die Cuts with a View (cutest school paper ever), really cute baby through toddler lines from Sandylion, more new papers and embellishments from Kelly Panacci, and last but certainly not least Maya Road! .
Don't forget the fall season is just around the corner, K & Company has an awesome line, Halloween Whimsy. This spooky line not only has paper and embellishments, but cute decorations that are a snap to put together!
Recieve a 20% discount on all orders of $25.00 or more, today through Saturday September 13th. Use coupon code - fall08
Shipping is still only $4.95 on all order shipped within the U.S.
Have a great day!
Cathy x
Saturday, September 6, 2008
Making your own chipboard buttons
I have a really fast and easy way to show you how to make your own chipboard buttons from the patterned papers you may have lying around in your stash--
For my example, I chose the brand new line from Graphics 45 at Allyscraps. You'll need some chipboard to make the buttons, a circle punch or die-cut machine to make your "buttons", a hole punch, Diamond Glaze, your paper, and a glue stick.

Start by cutting circles from the chipboard and patterned paper and then adhere the two together. You can stamp on top of the button to add a little texture, or leave it like it is--I chose to stamp on top of my patterned paper for a different look--

When it's dry, punch two holes in the middle of the circle to give it a "button" look. Add the Diamond Glaze on top to give it a glazed, 3-D look and let it dry for at least 2 hours.

Add some ribbon or floss, and you instantly have a really cool coordinating button for your layout--
Add some bling to the top of your buttons, or leave them as is...


This is a quick and easy way to add your own embellies to your pages!!
This layout I made of my mother-in-law to frame and hang on my wall in my home---

Happy Scrapping!!!
~~Kary
Subscribe to:
Posts (Atom)