Thursday, July 31, 2008

JULY Design Team Reveal

We had an awesome challenge for our Design Team reveal this month. Cathy sent us each a group of products in our kit.... we all received exactly the same stuff to make a layout with. 5 scrapbookers, 5 items. Then to add another twist, we had to make our page using an awesome sketch by our very own Debbie Gaydos. So, here are the products that we got to use.

3 pieces of American Crafts AMPLIFIED patterned papers. All were double sided and just gorgeous!
Synthpop
GoGo (this paper was so pretty and pre-scalloped)
Boom Box (embossed... yummy)
A big pink Bazzill flower.
One super big black Bazzill brad.
A fun yellow bling arrow by Glitz.
And black loopy lou letter stickers by Doodlebug.

We were also allowed to add a few items from our stash. Just a few... and the girls did really well with this... BUT I was a huge cheater pants, using quite a few things from my stash. (Don't tell them though, hopefully they won't notice!)

So you want to see the sketch?? It is so cool, and was so much fun to work with. We all used it in different ways; as is, upside down, mirror image, etc.


Here are our takes on the sketch, I always find it so interesting to see how DIFFERENT layouts can come up with the same items and a sketch too. Every single one of them is just awesome.

Silly Girl by Trish


Camera Ready by Dana


Cheeky Girls by Morag


Angel in Free Flight by Debbie


Top Ten Reasons by Kay


Thanks so much for checking out our Design Team reveal! (Kary's on vacation this month, so we will post hers when she gets back.) We hope you will be challenged to use the sketch (and maybe try to these awesome products)... to see what you can come up with!

~ Dana

Monday, July 28, 2008

Dream Street, Maya Road and Paper Bliss

Anyone else feeling like Christmas in July?

Well you wouldn't be the only ones. There is a lot of Christmas fever going around and Ally Scraps is no different.

Wonderland from Dream Street Papers has beautifully co-ordinated double-sided paper to give you that head start.

Fun and Games also from Dream Street Papers are a gorgeous colour combination good for any time of the year.

We have just added a brand new line of school papers from Scrappin Sports. This great line will take you from Pre School to Graduation, and they are here just in time for school!

If you're looking for that finishing touch or something totally cute then look no further than Paper Bliss. We have also added more gorgeous chipboard and rub-ons to our Maya Road section. Check them out!

And remember even though the price of gas, and postage has risen, Priority Shipping at Ally Scraps is still only $4.95 within the US.

Thank you all for your comments. It's really helped to get the blog moving. OK, so I've used a random number generator (random.org) to pick a number from the 31 comments we received.

Random Integer Generator
Here are your random numbers:

11 Timestamp: 2008-07-28 18:04:38 UTC


Wendy - you're the winner! If you could send me your email address/contact address to allyscraps@freeuk.com, I'll send you something from me.

Thanks again all. I'm sure this won't be the last time so please continue to comment - it means so much to us all!

Morag x

Sunday, July 27, 2008

Book of Me

We are generally the least featured person in our scrapbooks. However, future generations will want to know about us too. What did we like? What did we do? This is why a Book of Me (BOM) is such a great idea.

We've been running a bi-weekly 'challenge' to get us going with our BOM. We have had some wonderful inspiration from guests. This week was the turn of Tracy.

{Prompt #11: My Travels}

Here's what Tracy had to say:
Sometimes I forget that I did have a life before I had kids. Even though I only started scrapping about 3 years ago I have done LO's from the time my first ds was born 7 years ago, but very few from before that. For that reason I wanted to document something that was very specical to dh and I before we had kids. And that was traveling. We tried to go somewhere every year, and now I see how special and precious that time was for us. So I have done an initial LO describing that and a LO from one of our trips. I plan to do a few more LO's from other trips we took before the kids came along.


Tracy has created a 'title' page for her travels.


As well has creating a wonderful LO about her travels to Alaska.


I chose to make the most of the Making Memories Road Sign paper and document a trip to California. I had so many photos that I created an accordian album to hold more.


By simply folding a strip of patterned paper into an accordian, I was able to hold another 6 photos and journalling.


So why not join us this week and create a LO about your trips?

Today is the last chance to add a comment. I'm going to be picking one lucky winner in the morning for a RAK. So don't be shy!

Happy Scrapping

Morag x

Saturday, July 26, 2008

Make Your Own Flower Embellishment

Hi Everyone!
I love to find new techniques for making one of a kind embellishments from scratch, it makes me feel so crafty!

While surfing the web the other day I found this fabric flower tutorial:
http://http://blairpeter.typepad.com/weblog/2006/03/fabric_flowers.html

I did make a few out of fabric and then I figured I would try with paper. (instead of using two of the larger flowers as directed on the tutorial, I traced and cut only 1 for the base). Here is my result:

You can "kick it up a bit" by printing the patterns at 50% for smaller flowers or at 100%+ for bigger flowers. You could also try the same effect using premade flowers of the same type (or get funky and use different types!).

Have fun making your own flowers!

Friday, July 25, 2008

Stamp of Approval

Stamps are such a great investment. You buy them once and use them again and again. Using different coloured inks or mediums can change the whole look of an image. Colouring in an image can change the look again.

I noticed that Cathy has a huge selection of great stamps here. With such a great selection from the ever popular Maya Road, Basic Grey to new manufacturers such as My Favorite Things.

There is also a huge range from the classics such as Autumn Leaves. The latest stamps are all here as well as the favourites. Gypsy Style is one of my personal favourites.


I love the mixture of decorative corners, really hip images (I'm a real sucker for birds) as well as the great labels. Rhonna Farrer really knows how to make anything look great.


Trees are a reallly hot item at the moment and they look set to stay around for a while. Love Grows has some unique tree and flower images which would look fantastic clustered together in a corner of a layout or stamped on its own on a card. This one is definately hitting the basket!

So grab a coffee and have a browse through all those lovely stamps at AllyScraps.

Don't forget to leave a comment to be in with a chance of a RAK from me!

Happy Scrapping.

Morag x

Thursday, July 24, 2008

Day 2

Gosh, it's hard work keeping a blog isn't it? This is why my personal blog only gets updated once in a blue moon. LOL.

Well thank you ladies for your comments so far. It's nice to see some names I don't recognise there. How about some of you drop by the AllyScraps Forum and introduce yourselves? You'll be surprised to see that there is a bunch of very friendly people hanging out.

The second day then. How about focussing on you? We've been running a little Book of Me challenge. We set a prompt every other week (or fortnightly if you're English). We have a whole bunch of people who provide some inspiration for the prompt. It is a great way to try something different and get your BOM going.

The story so far; we're up to prompt 10 already. This was set by Susan. What would you write in a letter to your younger self? WOW, that was thought provoking. I for one could have written a book!

Here was my take on this.


I needed to include my journalling in a letter so I folded it up really small and tucked it in with the embellishments.


How exciting will it be in 20 years time to open it up and read it!


There are loads of shining examples to be found in the forum here. Or why not pop in on the gallery to see even more?

If you want to find out what the previous prompts are - take a look here.

So, there will be more tomorrow. I'll see if I can persuade someone to help me out with some inspiration. In the meantime. Don't forget to leave your comment for a chance at my RAK or drop by the forum to find some new friends.

Happy Scrapping!

Morag x

Wednesday, July 23, 2008

Blog Fest

Every day for the rest of this week (well until Sunday at least), we'll be posting a bit of new inspiration. Just to keep you coming back, I will donate a RAK to one lucky person who leaves a comment this week. You can enter as many times as you like, the more comments, the more chances you have!

So how about a little sunshine to start things off? The Happy range from Chatterbox has such rich colours and fun designs. Perfect for all those summer layouts.


We may not get much sunshine in England, but it was fun adding a little to my page.


The vibrant colours look great against the brown cardstock. The Happy Stickers add just the right amount of sparkle.

Don't forget to leave a comment and check back tomorrow for more inspiration.

Morag x

Thursday, July 17, 2008

Thinking outside the "Page"

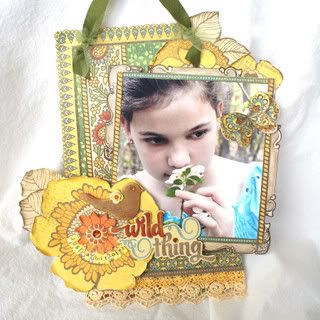
I'd like to challenge everyone to try something new next time you sit down to scrapbook. Make a layout without using a 12x12 background paper! Sounds easy enough, right? Instead of a page to put in your album create a wonderful wall layout with your favorite photos and paper. Why buy an expensive frame set or wall decoration when you can create your own!

Photobucket

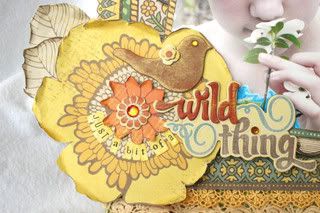
Recently I made this wall layout of my daughter in our backyard. She loves to be out in the "wild" always picking flowers & plants and creating all kinds of concoctions. She loves exploring in the woods and would probably live in a tree house if we let her! I used paper and embellishments from the beautiful Wild Saffron Collection by K & Company, and added a few Making Memories tiny alphas, some ribbon and rhinestones. The base of my wall layout is a 6x12 piece of chipboard. After covering it with pattern paper I added a photo that I adhered to a chipboard square. I mounted it on the base with pop dots. Then I finished it with embellishments, ribbon and distressed paper flowers. How easy is that!

Photobucket

To create your own "wall layout" you'll need:

Your favorite photo or photos mounted on chipboard
Chipboard background-you choose the size and shape
Pattern paper and embellishments
Pop dots and ribbon or wire used for hanging your layout
*Heres a little tip-If your wall hanging tips to one side because of too much weight ask your dh for a metal washer. You can tape it to the back to even the weight out.

Need more ideas?:

Create an oval, rectangle, square or heart shape for your background-or even combine them.
Attach multiple photos in rows horizontally or vertically
Create multiple layers of dimension by using pop dots
Make several and attach together with ribbon
Make a wall layout with a family or holiday theme and give as a gift!

The possibilities are endless! I hope this inspires you to do a little "outside the page" scrapbooking. For more inspiration be sure to drop by AllyScraps and take at peek at our awesome gallery!

See you there!

~Kay

Tuesday, July 15, 2008

A POCKET full of memories....

Well, school's been out for a few weeks, and it's time to get organized! I tend to save tons of my girl's artwork, school assignments, writing samples, etc. from each school year and I find it SO hard to store them all. So, I came up with an idea to keep them right in their scrapbooks... twice a year I make a school work POCKET PAGE to store all of those memories. It's so easy, fun to do, and it is a great project to work on when you've lost your mojo for making a full blown scrapbook page.


I made this pocket page with the awesome Scenic Route Appleton line of scrapbook papers and embellishments. I also used the super cool new Bazzill with an edge yellow border. The pocket is made with a full size piece of paper, then a 5" (or so) piece to go in the front. I embellished the top of the front sheet and then sewed a zigzag stitch with my sewing machine around 3 sides to close the pocket. If you don't have a sewing machine, you can use eyelets too!

I handcut a tag for my words and added a paperclip, ribbon and a few other embellies to make it extra cute! AND, guess what? You don't have to make it just for school stuff! How about Christmas (cards, letters or artwork) or birthday cards too. Here is one I made a while ago for keepsakes of Christmas.


Hope these examples will help you decide how to organize some of your "hard to store" memorabilia and fun keepsakes. Thanks for taking a look, happy scrapping!

~ Dana

Saturday, July 12, 2008

an easy way to get lots of photos on your page!


Do you ever find yourself wanting to include lots of photos on a page, but not sure how to make it work? I recently did this page with the fun Cosmo Cricket Get Happy line, also featuring American Crafts Sprinkles Thickers in blue, and stamps by Kelly Panacci and Maya Road.


Since the page is about my experience at a monster truck jam with hubby and my boys, I wanted to include lots of photos of the trucks on my page. To make this easier to accomplish, I did some of my work in my photo editing software (in this case, PSE 6 - but similar techniques could be used in many other photo editing programs as well).


The horizontal and vertical "strips" that you see include eleven 2x2 photos, but were printed as just four 4x6 photos. If you print your photos at home, you can easily accomplish this result by placing and sizing the photos side-by-side in a Word document, and printing on 8.5x11 photo paper. But if you are like me and prefer to have your photos commercially printed, with just a little bit of prep work prior to uploading your photos, this is still easy to do!


1. For each grouping of photos, open the 3 photos in PSE. Starting with the photo that you want in the center of your strip, crop the photo to the desired size - mine are all 2x2. When you crop, be sure that the "resolution" option box at the top is set to 300.


2. Go to image -> resize -> canvas size, and expand the canvas to 6x4. Change the "anchor" from the default center of the image, to the center-top row of the image. This will make it easier to align the photos in step 5 below.


3. Now go to the photo that you want to place to the left of the center photo (for a horizontal strip). Again, crop the photo to the desired size. making sure that the resolution is set to 300.


4. Select the "move" tool, and drag the cropped photo onto the first image (the one for which you resized the canvas in step 2 above). This will also make that 6x4 photo the active image.


5. Select both layers of the image (the background layer, which is your 6x4 canvas; and also the layer that contains the new 2x2 image). Make sure that the move tool is selected, and go to align and align left edges, and then again go to align and align top edges. Your left-most image is now snugly nestled into position in the left-top corner of the image.


6. Repeat this process with the third image, except in step 5 you will align right edges and top edges.


When you are finished, you have a 6x4 image that looks like this:


Once printed, this is easily cropped into the 6x2 strip of 3 photos for use on the page! Now, if this process seems like more trouble than it's worth - believe me, once you walk through it a time or two, you will see that it's really very easy to do. And, not only does it streamline the task of putting together your page, since the photos are already cropped and can be positioned as a group (rather than trying to line up 11 individually cropped photos on the page), but it also saves money! Instead of paying to have 3 photos printed, I got a 3-for-1 deal. You'll notice also, I could have added a second strip to the lower part of the photo, and thus gotten a 6-for-1 deal! Now who doesn't love that??... more money to spend on scrappy stuff!


I often use these techniques to add 2 or more smaller images to a 6x4 canvas for commercial printing, even when they will be placed separately on the page, just to save on printing costs. I hope you find these tips useful and will try them out - I would love to see the page you produce using them!


- Debbie

Wednesday, July 9, 2008

Free Shipping & Free Gift!

It's that time again, summer CHA is a little more than a week away. In anticipation of all of the great new products we will be bringing in, we need to make room. We have added some great "grab bags" from manufacturers such as Pink Paislee, October Afternoon, American Crafts, etc. these bags contain items from their latest releases!

We are also offering Free Shipping on all orders of $20.00 or more shipped within the US. And that's not all, if free shipping and 50% off Grab Bags are not enough, every order placed will recieve a "Free" Embellishment or Clear Stamp! This offer is valid on all order placed through Friday July, 11th. For free shipping enter discount code cpfree07. No code is needed for the free gift.

Have a great week

Cathy

Sunday, July 6, 2008

Great Value

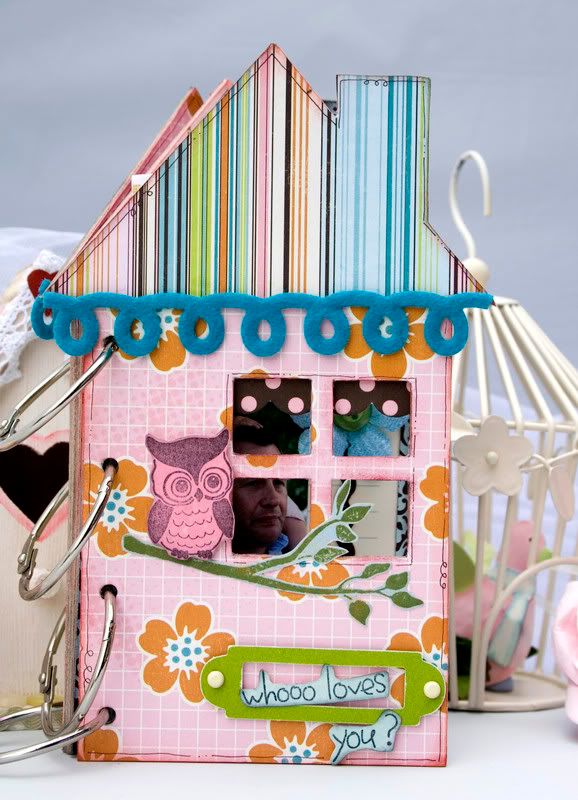
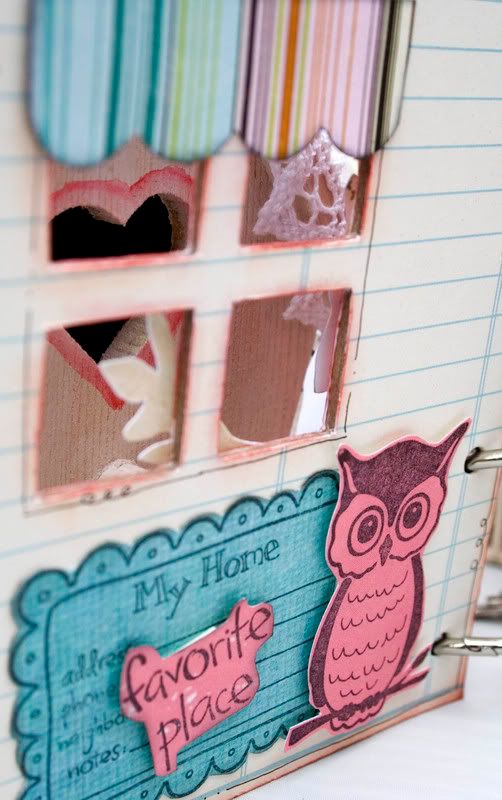
I simply love it when you open a package and it's just such great value for money. This house album from Maya Road is one such package. The gorgeous thick chipboard pages are just ripe for altering with patterned paper or paints. There are a huge 8 pages which is more than enough for an album.


I covered my album with the latest Daydream Collection from October Afternoon and Honey Pie Collection from Cosmo Cricket. These versatile papers and embellishments suit all sorts of projects.

I find the simplest way to cover chipboard is using a wet glue such as Modge Podge or PVA. Ensure that any bubbles disappear by burnishing your project with either a brayer or flat object such as a ruler, old credit card.

Once the paper is dry, trim edges with a sharp craft knife and sand edges for a perfect finish.


You may wish to ink the edges - I've used Distress Inks applied with a sponge. Doodle if you dare for extra definition!


I love the front window and stamped images from
OA's Night Owl stamp set which are set in one corner. Have real fun decorating with more stamps using the Home Sweet Home set.


Remember that value? The extra pages make excellent projects ideal as a gift for someone special. So this one will be for Cathy over at the store.


You could use a photo or I've used a quote as Cathy is illusive!

There are a huge range of these fun albums here. I know I'll be adding more to my collection!

Happy crafting.

Morag x

Thursday, July 3, 2008

Another use for that Ribbon Stash

Me again!
I told you all I would be back with more uses for that enormous ribbon stash you have hiding in your scraproom!

Today I am going to show you how to make another version of a ribbon flower (you may have seen this before, but if your like me you may have filed it away and forgotten about it!)

You will need:
approximately 6 inches of 1" ribbon (can use other widths but 1" works best!)
needle
thread
your scrap project

First you will need to cut your ribbon to approximately 6 inches.


Next you will need to make a running stitch along the bottom 1/4 of the ribbon (I used a contrasting thread color so it could be seen in the photo but you may want to use a coordinating color!)


Once you get to the end you can pull the two ends together, gathering the ribbon along the string and into a "circle" which will form your flower


Finally, tie the two ends together in a knot and VIOLA! You have a flower!


I added a button to mine for the center and used it to embellish this card!


I had a ton of fun making this flower and I hope you will too! Thanks for coming by to read the AllyScraps blog! Check back often for more exciting scrapbook project ideas!

Wednesday, July 2, 2008

Easy texture ideas for your layouts

I thought I'd share some really simple and easy ideas for using texture and layers on your pages--I get lots of sweet comments on my layouts about my "layers", so I thought I'd give a couple of tips on how you can use layers and textures to make your layouts "pop"!

I used the brand new Moxxie line from AllyScraps to make this layout, along with some K & Company "Margo" collection papers along with Prima flowers, Pink Paislee paper, Cloud 9 papers, and some Rusty Pickle lace ribbon. Just using different textures and patterns on your layouts can make a huge difference!

I first started by choosing different patterned paper that complimented each other. I really liked the flowers in the Pink Paislee and Cloud 9 papers and hand cut the blossoms from the paper.


Using a border punch to create a "rustic" texture on the corner of my layout, I cut the edges with the punch and then tore another edge from a different pattened paper and inked both. I then laid them together and added a bit of lace to the edge, staggering the lace with glue dots.


I then used handcut leaves from patterned paper and laid these on top of the edge of the lace and paper--you want to give the leaves a little dimension, so you can use either 3-D glue dots or pop dots.


After I layered the leaves, I added some Fancy Pants "Simplicity" Rub-ons

and then layered my embellishments on top of everything. I chose handcut flowers from patterned paper, metallic brads, a little bling, and some Prima flowers layered together for my embellies.


This is such a simple and fun way to add layers to your layouts!!


Happy Scrapping!!!

~~Kary