Thursday, July 29, 2010

How do you approach making a layout based on a SKETCH??

We're so lucky to have many, many wonderful sketches here at AllyScraps designed by our friend Debbie Gaydos. Her sketches are SO easy to work with... and so I find myself using them all the time. Do you make layouts from sketches? If so, how do you begin? I'll tell you my method, I hope it inspires you to make more layouts from our sketches (and hopefully participate in our monthly sketch contest).

First of all, I print out all of the sketches that inspire me. I 3 hole punch them and place them in a binder with dividers. My binder is divided into sections by the number of photos included on the sketch (or magazine clipping or other inspiration). My great scrappy friend Karlyn showed me her awesome binder... and it was such a great idea, that I (copied hers) made one for myself. :)

When it's time to choose a sketch, I tend to choose my photos first. If I have 3 photos that I want to use... I go to the 3 photo section of my binder, and look for a sketch that matches the size and/or orientation of my photos. Sometimes I start with the sketch first, then go to my photo files and choose a photo that matches the design of the sketch. Either way works equally well for me!

Do you know why I love sketches?? Because they are a wonderful jumping off point. If you follow a sketch closely, the basic layout of your page is done for you. If you only choose a couple of elements to borrow, it still encourages your crafty freedom, but helps with some choices. Let me show you.

Remember Debbie's sketch that I posted on the blog in May??
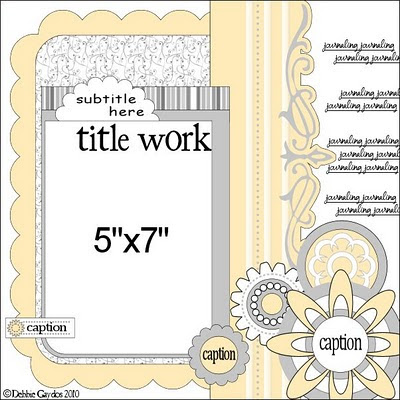


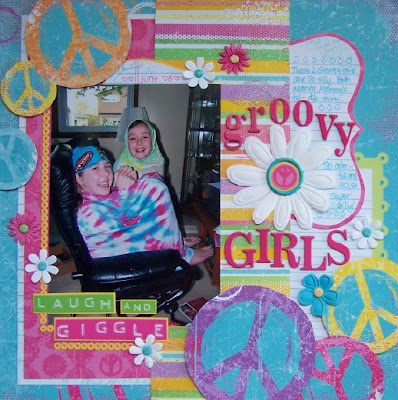
I love, love, love this sketch. I love that it uses a single 5 x 7 photo with a portrait orientation. I love the flowers and the fun border running up and down. I knew right away that I would be making a layout from this sketch. First I chose the photo, it was an easy choice. Then I chose the papers that matched my theme and would work with the sketch. I noticed that the sketch used approximately 5 papers plus a border strip. The free spirit collection by My Little Yellow Bicycle was exactly what I needed. Instead of using 5 papers, I used 3 patterned papers PLUS another piece that I cut into a border strip. I added these journaling blocks to my page to write on, instead of putting the journaling directly on the background paper. As you can see, instead of using flowers on the bottom right of my page, I let the patterned paper do the work. I hand cut peace signs right out the paper and then placed them on pop dots to give some added dimension. Thought a few more at the top left would look cute too.

I changed up the title placement, added a few sticker words, some small flowers and a big flower in the middle. That's it, a quick and easy layout.


Using sketches helps me get layouts done QUICKLY... and lately, that's important. I hope you enjoy using Debbie's sketches for inspiration. Debbie is going to be doing monthly sketches to share with us, we're SO lucky!

Thanks for taking a look, and have a great weekend. Dana

Sunday, July 25, 2010

Bonus July sketch!!

Another beautiful sketch from our friend Debbie Gaydos.


Enjoy!

Friday, July 23, 2010

"Summer" mini album by Linda Albrecht

Linda Albrecht has been busy making an adorable mini book of all of her summer memories! The photos, papers and embellies all scream summer to me. Love that. :) Even the Maya Road album she started with looks wave-like... don't you agree?? Take a look for yourself.


Ally Scraps Supplies
Melissa Frances Inspiration Transfer
Bo Bunny Sun Kissed, "Chillin" paper
Bo Bunny Sun Kissed, "Stripe" paper
Bo Bunny Sun Kissed, "Adventure" paper
Bo Bunny Sun Kissed, "Sun Kissed" paper
Bo Bunny Sun Kissed Adhesive Chipboard
Bo Bunny Sun Kissed Combo Stickers
Fancy Pants Rusted Sun Buttons
October Afternoon Thriftshop, "One of a Kind" paper
October Afternoon Fly a Kite Collection Label Stickers

Thanks Linda for sharing your awesome album with us, we can't wait to see next week's project. Have a great weekend. Dana

Tuesday, July 20, 2010

It's official! July sketch contest winner announced here.

A big huge CONGRATULATIONS to Ilene Tell of Delaware, our July sketch winner!! Here's the July contest sketch.


And, here is Ilene's take on the sketch. Love the pretty borders, the gorgeous flowers and of course the adorable photos. Awesome job Ilene.


Ilene won the whole "a walk in the park" collection from Echo Park... love that paper line! Lucky girl Ilene!


We had our biggest turn out yet this month for the sketch contest. A big thank you to all who participated, every layout was just beautiful, and the decision difficult as always. We have something special planned for our August sketch contest... and I'll give you a little hint. Anyone ever heard of Page Maps???

Have a great week! Dana

Wednesday, July 14, 2010

"You are my Sunshine" Catch- All

We are SO fortunate that Linda Albrecht is back at AllyScraps for July! Linda is one of our very favorite designers, and we are thrilled to see all of the projects that she has to share with us this month. :) Her first one is so adorable, what a wonderful gift it would make. Here are some directions from Linda.


This "Catch-All" base is made from a Melissa Frances Rectangle Scalloped Backdrop, a Melissa Frances Bingo Card, and a 2.5" x 7" piece of heavy chipboard. I thought that it would make a fun little "letters to mail" or "girly stuff" collection container. I think that we all have those things that need a temporary holder until we get them to their proper place.

Cover the Melissa Frances Backdrop piece with GCD's "Blue Redwork" paper, lightly sand the outside edges and ink with a creamy brown inkpad. Punch small holes at the top corners for the wire handle.

Cut a 4.5" x 4 3/4" piece from the red striped GCD paper. Cut stems and leaves for the felt flowers from green cardstock and adhere them to the left side of the striped paper. Machine sew along the stems, if desired, and also around the outside edges of the striped paper. Lightly ink the outside edges of the striped paper then hand stitch the "you are my sunshine" sentiment or use rub ons if desired, then adhere the piece to the front bottom of the Bingo card. Adhere a 2" piece of white lace to the top right side of the striped piece then adhere the felt flowers above the stems.

Cut two 1" x 12" strips from the GCD "Blue Calico" paper then make ruffles from them by folding toward one end at approximately every 1" of the strip. Machine sew the ruffles along the top edge or just hot glue the piece in place (for now just adhere the one near the bottom of the red striped piece.) Adhere white ric rac on the backside of the top of the Bingo card then adhere the remaining paper ruffle on top of the ric rac along the backside of the Bingo card. Add floss to 2 buttons then adhere them to each end of the ruffle that is along the bottom of the red striped piece. Add a label sticker to the top right side of the Bingo card by folding it in half around the Bingo card then cut the "happiness" word from the October Afternoon paper and adhere it to the front side of the label sticker.

Cut a 2.5" x 7" piece from heavy cardstock. If you do not have heavy cardstock you can glue a couple of pieces together to make a thicker piece. Cut the 2.5" x 7" piece of cardstock at the 7" length on the diagonal from top corner to bottom corner. (These two pieces will make the sides of the container, the original outside 7" lengths will be glued to the scalloped rectangle backdrop and the diagonally cut sides will be glued to the backside of the bingo card.) Adhere "Blue Redwork" paper to what will be the inside of each chipboard piece on each side. Next, when adhering paper to the outside of each chipboard piece, you will need to have an excess of 5/8" on the top and along each side of the piece. After the paper is adhered to the outside of the chipboard sides, fold over the excess along the top edge and glue down. Next, fold over the excess paper along each side, add hot glue or a strong glue such as "The Ultimate" to the side that will be glued onto the back of the Bingo card and hold in place. Do the same with the excess that will be glued to the rectangle backdrop piece and hold in place. Run a bead of adhesive along bottom of the Bingo card.


Supplies
GCD Studios Homespun Chic Felt Flowers
GCD Studios Homepsun Chic Lacquer Paper "Applique"
GCD Studios Homespun Chic Paper "Blue Redwork"
Melissa Frances Bingo Card Singles
Melissa Frances White Ribbon
Melissa Frances Backdrops- Rectangle Scalloped
October Afternoon "Thrift Shop" paper "One of a Kind"
October Afternoon "Fly a Kite" collection Label Stickers
Fancy Pants "Rusted Sun" Buttons

other supplies
green cardstock
Wire for handle
Black and ivory embroidery floss
Colorbox Fluid Chalk Inkpad, Creamy Brown
The Ultimate adhesive
hot glue stick

Thanks Linda for such an awesome project! I hope that you all will try it. Have a great week.

~ Dana

Monday, July 12, 2010

New Bangs

Chris Hertel's daughter loves purple, so it was a given for her to use this gorgeous Utopia Collection for a layout about her new stylin' do!


Here are some instructions from Chris: "Using a 12 x 12 purple cardstock base, I trimmed a piece of Tranquil paper from Kaiser Craft's Utopia Collection, and
also a piece of Bliss, to 5" x10", adhere them side by side leaving a
1" border all around. I rounded the opposite corners of the papers.
Next I took 3 strips (1 1/2" x 12) of the back side of Tranquil,
glued them together, then folded (using approx. 1/2 inch folds) like
an accordion. Unfold the accordion, and refold the paper into
pleats, then zigzag stitch down the center. With all the folds the
paper will come out much shorter, to about 12" long. I folded a piece
under to make it about 11", and then glued it in the center of the
patterned papers. I then made some embellishments using my die
cutting machine, and added some purple Stickles and some BoBunny
iCandy Jewels. Add your photos, embellishments, journaling and title."


Supplies
Paper: Kaiser Craft Utopia Collection
Tranquil and Bliss
DieCuts: Kaiser Craft Utopia, and some were made with my die cutting
machine.
Stickles: Purple
Title: American Crafts Thickers Shoebox Light Blue and My Little Shoebox
Mini Alpha Stickers Apple


Thank you so much to Chris for being such an awesome guest designer. She's been an awesome friend of AllyScraps for quite some time and I know you'll want to keep in touch and to check out more of her inspiration! Here is a link to her blog. Thanks Chris!

~ Dana

July sketch contest, only a week left!

We hope you're working hard on your July contest layout. Here is the inspiration sketch. An amazing one by our own Debbie Gaydos.


Here is all the info! Due date is Sunday, July 18th. Good luck! Dana

Thursday, July 8, 2010

It's been such a pleasure to have has Cherry Nelson as one of our guest designers for June! Her projects are just beautiful, lots of inspiration that's for sure! I'll certainly be checking Cherry's blog regularly for even more inspiration. Thanks so much Cherry for being a new friend to AllyScraps! Here are Cherry's last two projects for us, love them!


Here are some directions from Cherry. "Make cards from cardstock (mine are 4 1/2 x 5), then cut the first pattern paper so it fits and covers all cardstock. Cut your next piece a bit smaller around 3 1/2 x 4 1/2, adhere to cards and add stitching if you would like. I added a paper doily to one of my cards, then added crinkled ribbon around each card and tied double bows. Use foam adhesive to adhere your inspiration cards to front. Add details such as chipboard from chipboard ladies, add trinkets pins and rhinestones and buttons...and you're done!"


Supplies
GCD Studios Homespun Chic line inspiration cards
Homespun chic chipboard ladies
homespun chic diecut borders
paper-homespun chic garden
homespun chic petit blossoms
October Afternoon fly a kite paper
Maya road clear crystal trinket pins
Pink Paislee artesian elements swirl

Thanks so much Cherry! Have a great weekend. ~ Dana

Tuesday, July 6, 2010

Hey... did you know??

That our own dear friend (and AllyScraps owner) Cathy, actually scrapbooks!!! Yes, the rumors are true. And... she's GOOD! Here are a few things that she's been working on lately. Such super cute layouts... now we just need to get her to add some pictures. :)


Cathy used products from BoBunny for her layouts. The Flower Child collection.
Aquarius
Flower Child
Beads
Hippy
Cutouts
Cardstock stickers
Chipboard
I Candy Jewels
Flowers

Thanks Cathy, for FINALLY sharing your talent with us! Hey and some good news! We are still really lucky to have one more project each from Chris Hertel AND Cherry Nelson... and then guess who's coming back to AllyScraps in July??? Linda Albrecht. Hurray! See you later this week, we have lots more to share.

~ Dana

Friday, July 2, 2010

July SKETCH contest here at AllyScraps!

Time for a new sketch contest at AllyScraps for July! Loving this sketch by our very own Debbie Gaydos, super fun details, and an awesome design. Of course I'll be doing a layout based on this sketch super soon. :)


Cathy's given us an awesome prize this month for the winner, a whole kit of "a walk in the park" paper line by the Echo Park Paper Co. (I wish I could win it!!! :)


Here are the sketch contest rules, there aren't too many. Make a layout using Debbie's sketch as inspiration. You can flip it, turn it, mirror image it... just use the sketch to start your layout. Finish your project and e-mail the image to us by Sunday, July 18th at midnight Eastern time and we will choose a winner soon after. Send it to allyscraps@gmail.com. Good luck and have fun.

~ Dana