
With Summer well under way, and the holiday weekend approaching, I know everyone is super busy! When you get a chance take a little break and look at these great products I've just added!
The new Chatterbox is stunning! Also just added clear stamps from Autumn Leaves, Making Memories Passport, Two lines from Kelly Panacci, a new school line from Scenic Route, Appleton , and more!
For 15 % off your entire order, including items already on sale use discount code - july4th. This coupon is good through July 4th.
While you are on the site check out our message board, the ladies are friendly, they always have something going on, like bingo, challenges, and such, and new members are always welcome!
Have a great week, and a safe holiday weekend!
Cathy
Monday, June 30, 2008


Saturday, June 28, 2008
The Men in our lives....
The month of June... a wonderful time to think about all of the "Men in our Lives"... so that's exactly what we did. We, as a Design Theme decided on this theme together. We hope it will inspire all of you to scrapbook the memories (from long ago or right now) of YOUR MEN! Thanks for taking a look.


Here's Trish's layout... with such a wonderful memory of her daughter and husband. The title is so fun and the layering of papers and embellishments makes this layout a real winner! She used papers from Dream Street's Clubhouse line, and some thickers from American Crafts. The hand cut stars really draw your eye right down the page... awesome job Trish!

Awww, isn't this the sweetest page about Debbie and her "men"! Debbie's design is so pleasing to the eye... and I especially love the 3 hearts that run down the side... super cute! Debbie use the Sassafras Lass Robotics line for this layout, it's awesome to see these papers used in a non-themey way. She also used Bazzill edges in orange, a Scenic Route chipboard alpha in brown and some Fancy Pants flourishes for a finishing touch. Thanks for sharing your special birthday moment with us Debbie, you rock!

Morag's MAN is next up! I love seeing this beautiful picture of Morag and her DH, love this formal color combination and all of the lovely details that makes this page so beautiful! Morag chose the classy Teresa Collins Damask Collection for her patterned paper line and enhanced the layout with flowers by Bazzill and little letters by Making Memories. Just a beautiful layout Morag.

Kay showcased her favorite MEN with the fun and funky layout using Cosmo Cricket's Get Happy line of papers and stickers! I love how the black and white photo pops of the papers and how all of her embellies surround the photo. But do you know what I like the best?! The awesome bubble wrap painting technique. Isn't that SO COOL??, and it matches the dot paper! She also used American Crafts thickers, Making Memories little letters and some clay shapes that she made and painted. Awesome job Kay, thanks for sharing!

Wow, Kary is lucky enough to have lots of MEN in her life! :P and this awesome layout really showcases all of them! Those little round pictures are so pefectly placed, and really give us a look at her life. She chose to use the Rusy Pickle Bottle Rocket's line for her project, and the colors are really fun! She also used embellishments from the My Mind's Eye Lush Blooms collection and little letters by Making Memories. As usual Kary's layering makes the layout so dimensional, love it Kary!

Only one Man in my life, cuz I live in a house full of girls.... and here he is. My MAN and my youngest DD.... I think he is her best friend. They spend so much time together. :) I used some older Scenic Route for my layout, the Laurel line of papers and embellishments, and I must say that I still love this paper. But I had fun updating it with some new fun finds... such as these Maya Road sheer journaling blocks (notice how you can add colored paper to the back of these to make them look totally different), these Scenic Route chipboard letters and some glittery American Crafts letters too. I also added these fun Scenic Route rubons.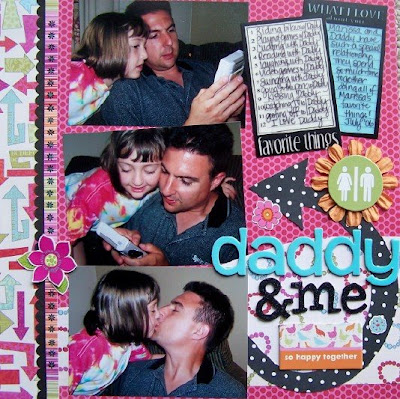

Thanks so much for checking out what we've been working on!!!
~ Dana
Monday, June 23, 2008
Use Your Ribbon Stash!
I have one and I know you do too!
A huge stash of RIBBONS!
It is easy to get stuck in a rut with your ribbons.
I find myself using them in the same way over and over.
Tying it on a tag,
Using it as a border or
Stapling it as a "fringe"
The other day I challenged myself to use my ribbons in a new and different way. (You may have seen this done before, but forgot! - so I am jogging your memory!)
Here is my first project:
It is easy and you can make one (or two or three) too! Here's how:
First you will need the following:
Your project (I chose to do a card for demonstration purposes and because I wasn't sure how it would come out so I didn't want to commit to a bigger project!)
An anywhere hole punch (I used the MM one)
a length of ribbon approximately 12-16 inches long (thinner ribbons work best!)
a large eye needle (usually used for doll making, etc)
a ruler
a pencil or pen
1. Now you will need to decide on the placement for your flower. Use your pencil to make a center point. Next use the ruler to mark 4-6 additional spots .75-1.5 inches away from your center (in a star-like pattern)
A huge stash of RIBBONS!
It is easy to get stuck in a rut with your ribbons.
I find myself using them in the same way over and over.
Tying it on a tag,
Using it as a border or
Stapling it as a "fringe"
The other day I challenged myself to use my ribbons in a new and different way. (You may have seen this done before, but forgot! - so I am jogging your memory!)
Here is my first project:

It is easy and you can make one (or two or three) too! Here's how:
First you will need the following:
Your project (I chose to do a card for demonstration purposes and because I wasn't sure how it would come out so I didn't want to commit to a bigger project!)
An anywhere hole punch (I used the MM one)
a length of ribbon approximately 12-16 inches long (thinner ribbons work best!)
a large eye needle (usually used for doll making, etc)
a ruler
a pencil or pen
1. Now you will need to decide on the placement for your flower. Use your pencil to make a center point. Next use the ruler to mark 4-6 additional spots .75-1.5 inches away from your center (in a star-like pattern)
 2. Use the anywhere hole punch to punch holes in the marked spots.
3. Thread your needle with the ribbon and sew up through the middle hole leaving a small tail on the opposite side. Sew back down through one of your "petal" holes.

4. To complete the next "petal" go back up through the middle hole and then down into another "petal" hole. Repeat the process until you have completed all the petals. (Make sure you keep the ribbon from twisting on the underside or your page will become very bumpy!)

5. To finish the flower tape the ends to the back of the project!
Now, go have some fun making some ribbon flowers!!!
I will be back soon with another new (or forgotten) ribbon project!!!
xoxoxo
Trish
Saturday, June 21, 2008
Super Star STYLE!

Do you get STUCK when it's time to use lots of patterned paper on your layouts? Do you tend to only use 1 or 2? Well... one of my favorite techniques to use on my layouts, is a big pile of patterned paper. Did you notice that I used 6 (yep SIX) different patterns on this layout... and the only cardstock I used was white?? I love a BUSY scrapbook page... and if you do too, but are afraid to use lots of patterned paper, here are a few tips that might help you out.
#1 - match the papers by COLOR. Choosing papers from a single line can really help you with this step. I used 5 patterned papers from the We R Memory Keepers FRENZY line, and threw in one more from my stash. Let the paper designers do the matching work for you! Add a touch of black too!
#2 - think about SCALE when you choose your papers. If all of your papers have a large scale design, they will tend to clash, even if the colors match. Notice how the papers I have chosen vary in scale (the size of the pattern.) A large scale diagonal strip and a small scale dot, plus a medium scale grid (in 3 different colors) too. Put them all together and your eye won't get stuck on any one paper.
#3 - choose papers of similar style. These are all bright and bold and work perfectly together.
I also threw in lots of embellies to busy up the page... take a look at the WRMK Frenzy Chipboard Words. There is one for every theme... and some Doodlebug glitter chipboard letters in Ladybug match perfectly! My little bit of black comes from super cool Glitz rubons and the fun girl rubons by Scenic Route, love how the butterfly ads a little feminine touch.
Thanks so much for taking a look... and hope you will try some serious layering of patterned paper soon!
~ Dana
Tuesday, June 17, 2008
Thinking about Details
Have you ever finished a page and thought it could use just "a bit more of something", but didn't know where to start? That's a great time to look around your scrap room, grab your extra embellishments, ink, pen and bling and start thinking about details. Adding that extra creative flair to your page can be as simple as inking a die cut, or layering your ribbon. In the layout below I used MME Garden Party Lush Blooms pattern paper and die cuts to create this page about our sweet dog Maddie.
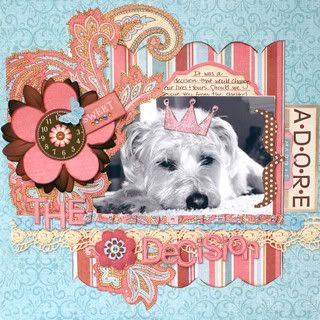
After the basic page was laid out I started adding my detail. I little bling and ink can go a long way! Can you spot all the little extras that were added? (hint-there are eleven in all!)
1. Hand cut scallop pattern on edge of mat paper
2. Cut out paisley pieces from patterned paper
3. Used brown ink to highlight die cut and paper edges
4. Pleated paper strips to make ribbon
5. Outlined chipboard letters with pen
6. Tinted felt flower with Glimmer Mist to match
7. Added gemstone bling to die cuts, pp & crown
8. Used stickles on felt butterfly & crown
9. Created dimension by layering paper
10. Printed Maddies name on pp using a Dymo & sanding letters
11. Cut die cut circles to create flower petals
Next time you want to add a little extra "something" to your pages, take a second look at your scrapping supplies, and definitely think "details" For more inspiration take a peek at the awesome Ally Scraps Gallery. You can also find the MME Lush Blooms collection and Heidi Swapp felt butterflies & flowers at the Ally Scraps store.
Happy Scrapping!
~Kay

After the basic page was laid out I started adding my detail. I little bling and ink can go a long way! Can you spot all the little extras that were added? (hint-there are eleven in all!)
1. Hand cut scallop pattern on edge of mat paper
2. Cut out paisley pieces from patterned paper
3. Used brown ink to highlight die cut and paper edges
4. Pleated paper strips to make ribbon
5. Outlined chipboard letters with pen
6. Tinted felt flower with Glimmer Mist to match
7. Added gemstone bling to die cuts, pp & crown
8. Used stickles on felt butterfly & crown
9. Created dimension by layering paper
10. Printed Maddies name on pp using a Dymo & sanding letters
11. Cut die cut circles to create flower petals
Next time you want to add a little extra "something" to your pages, take a second look at your scrapping supplies, and definitely think "details" For more inspiration take a peek at the awesome Ally Scraps Gallery. You can also find the MME Lush Blooms collection and Heidi Swapp felt butterflies & flowers at the Ally Scraps store.
Happy Scrapping!
~Kay
Subscribe to:
Posts (Atom)

